


绑定和监听连接
我们利用visual studio创建一个空项目,项目名字为GateServer,然后按照day03的方法配置boost库和jsoncpp配置好后,我们添加一个新的类,名字叫CServer。添加成功后生成的CServer.h和CServer.cpp也会自动加入到项目中。
CServer类构造函数接受一个端口号,创建acceptor接受新到来的链接。
CServer.h包含必要的头文件,以及简化作用域声明
#include <boost/beast/http.hpp>
#include <boost/beast.hpp>
#include <boost/asio.hpp>

namespace beast = boost::beast;         // from <boost/beast.hpp>
namespace http = beast::http;           // from <boost/beast/http.hpp>
namespace net = boost::asio;            // from <boost/asio.hpp>
using tcp = boost::asio::ip::tcp;       // from <boost/asio/ip/tcp.hpp>
CServer.h中声明acceptor, 以及用于事件循环的上下文iocontext,和构造函数
class CServer:public std::enable_shared_from_this<CServer>
{
public:
    CServer(boost::asio::io_context& ioc, unsigned short& port);
    void Start();
private:
    tcp::acceptor  _acceptor;
    net::io_context& _ioc;
    boost::asio::ip::tcp::socket   _socket;
};
cpp中实现构造函数如下
CServer::CServer(boost::asio::io_context& ioc, unsigned short& port) :_ioc(ioc),
_acceptor(ioc, tcp::endpoint(tcp::v4(), port)),_socket(ioc) {

}
接下来我们实现Start函数,用来监听新链接
void CServer::Start()
{
    auto self = shared_from_this();
    _acceptor.async_accept(_socket, [self](beast::error_code ec) {
        try {
            //出错则放弃这个连接,继续监听新链接
            if (ec) {
                self->Start();
                return;
            }

            //处理新链接,创建HpptConnection类管理新连接
            std::make_shared<HttpConnection>(std::move(self->_socket))->Start();
            //继续监听
            self->Start();
        }
        catch (std::exception& exp) {
            std::cout << "exception is " << exp.what() << std::endl;
            self->Start();
        }
    });
}
Start函数内创建HttpConnection类型智能指针,将_socket内部数据转移给HttpConnection管理,_socket继续用来接受写的链接。
我们创建const.h将文件件和一些作用于声明放在const.h里,这样以后创建的文件包含这个const.h即可,不用写那么多头文件了。
#include <boost/beast/http.hpp>
#include <boost/beast.hpp>
#include <boost/asio.hpp>

namespace beast = boost::beast;         // from <boost/beast.hpp>
namespace http = beast::http;           // from <boost/beast/http.hpp>
namespace net = boost::asio;            // from <boost/asio.hpp>
using tcp = boost::asio::ip::tcp;       // from <boost/asio/ip/tcp.hpp>
新建HttpConnection类文件,在头文件添加声明
#include "const.h"

class HttpConnection: public std::enable_shared_from_this<HttpConnection>
{
    friend class LogicSystem;
public:
    HttpConnection(tcp::socket socket);
    void Start();

private:
    void CheckDeadline();
    void WriteResponse();
    void HandleReq();
    tcp::socket  _socket;
    // The buffer for performing reads.
    beast::flat_buffer  _buffer{ 8192 };

    // The request message.
    http::request<http::dynamic_body> _request;

    // The response message.
    http::response<http::dynamic_body> _response;

    // The timer for putting a deadline on connection processing.
    net::steady_timer deadline_{
        _socket.get_executor(), std::chrono::seconds(60) };
};
_buffer 用来接受数据
_request 用来解析请求
_response 用来回应客户端
_deadline 用来做定时器判断请求是否超时
实现HttpConnection构造函数
HttpConnection::HttpConnection(tcp::socket socket)
    : _socket(std::move(socket)) {
}
我们考虑在HttpConnection::Start内部调用http::async_read函数,其源码为
async_read(
    AsyncReadStream& stream,
    DynamicBuffer& buffer,
    basic_parser<isRequest>& parser,
    ReadHandler&& handler)
第一个参数为异步可读的数据流,大家可以理解为socket.
第二个参数为一个buffer,用来存储接受的数据,因为http可接受文本,图像,音频等多种资源文件,所以是Dynamic动态类型的buffer。
第三个参数是请求参数,我们一般也要传递能接受多种资源类型的请求参数。
第四个参数为回调函数,接受成功或者失败,都会触发回调函数,我们用lambda表达式就可以了。
我们已经将1,2,3这几个参数写到HttpConnection类的成员声明里了
实现HttpConnection的Start函数
void HttpConnection::Start()
{
    auto self = shared_from_this();
    http::async_read(_socket, _buffer, _request, [self](beast::error_code ec,
        std::size_t bytes_transferred) {
            try {
                if (ec) {
                    std::cout << "http read err is " << ec.what() << std::endl;
                    return;
                }

                //处理读到的数据
                boost::ignore_unused(bytes_transferred);
                self->HandleReq();
                self->CheckDeadline();
            }
            catch (std::exception& exp) {
                std::cout << "exception is " << exp.what() << std::endl;
            }
        }
    );
}
我们实现HandleReq
void HttpConnection::HandleReq() {
    //设置版本
    _response.version(_request.version());
    //设置为短链接
    _response.keep_alive(false);

    if (_request.method() == http::verb::get) {
        bool success = LogicSystem::GetInstance()->HandleGet(_request.target(), shared_from_this());
        if (!success) {
            _response.result(http::status::not_found);
            _response.set(http::field::content_type, "text/plain");
            beast::ostream(_response.body()) << "url not found\r\n";
            WriteResponse();
            return;
        }

        _response.result(http::status::ok);
        _response.set(http::field::server, "GateServer");
        WriteResponse();
        return;
    }
}
为了方便我们先实现Get请求的处理,根据请求类型为get调用LogicSystem的HandleGet接口处理get请求,根据处理成功还是失败回应数据包给对方。
我们先实现LogicSystem,采用单例模式,单例基类之前讲解过了
#include <memory>
#include <mutex>
#include <iostream>
template <typename T>
class Singleton {
protected:
    Singleton() = default;
    Singleton(const Singleton<T>&) = delete;
    Singleton& operator=(const Singleton<T>& st) = delete;

    static std::shared_ptr<T> _instance;
public:
    static std::shared_ptr<T> GetInstance() {
        static std::once_flag s_flag;
        std::call_once(s_flag, [&]() {
            _instance = shared_ptr<T>(new T);
            });

        return _instance;
    }
    void PrintAddress() {
        std::cout << _instance.get() << endl;
    }
    ~Singleton() {
        std::cout << "this is singleton destruct" << std::endl;
    }
};

template <typename T>
std::shared_ptr<T> Singleton<T>::_instance = nullptr;
实现LogicSystem单例类
#include "Singleton.h"
#include <functional>
#include <map>
#include "const.h"

class HttpConnection;
typedef std::function<void(std::shared_ptr<HttpConnection>)> HttpHandler;
class LogicSystem :public Singleton<LogicSystem>
{
    friend class Singleton<LogicSystem>;
public:
    ~LogicSystem();
    bool HandleGet(std::string, std::shared_ptr<HttpConnection>);
    void RegGet(std::string, HttpHandler handler);
private:
    LogicSystem();
    std::map<std::string, HttpHandler> _post_handlers;
    std::map<std::string, HttpHandler> _get_handlers;
};
_post_handlers和_get_handlers分别是post请求和get请求的回调函数map,key为路由,value为回调函数。
我们实现RegGet函数,接受路由和回调函数作为参数
void LogicSystem::RegGet(std::string url, HttpHandler handler) {
    _get_handlers.insert(make_pair(url, handler));
}
在构造函数中实现具体的消息注册
LogicSystem::LogicSystem() {
    RegGet("/get_test", [](std::shared_ptr<HttpConnection> connection) {
        beast::ostream(connection->_response.body()) << "receive get_test req";
    });
}
为防止互相引用,以及LogicSystem能够成功访问HttpConnection,在LogicSystem.cpp中包含HttpConnection头文件
并且在HttpConnection中添加友元类LogicSystem, 且在HttpConnection.cpp中包含LogicSystem.h文件
bool LogicSystem::HandleGet(std::string path, std::shared_ptr<HttpConnection> con) {
    if (_get_handlers.find(path) == _get_handlers.end()) {
        return false;
    }

    _get_handlers[path](con);
    return true;
}
这样我们在HttpConnection里实现WriteResponse函数
void HttpConnection::WriteResponse() {
    auto self = shared_from_this();
    _response.content_length(_response.body().size());
    http::async_write(
        _socket,
        _response,
        [self](beast::error_code ec, std::size_t)
        {
            self->_socket.shutdown(tcp::socket::shutdown_send, ec);
            self->deadline_.cancel();
        });
}
因为http是短链接,所以发送完数据后不需要再监听对方链接,直接断开发送端即可。
另外,http处理请求需要有一个时间约束,发送的数据包不能超时。所以在发送时我们启动一个定时器,收到发送的回调后取消定时器。
我们实现检测超时的函数
void HttpConnection::CheckDeadline() {
    auto self = shared_from_this();

    deadline_.async_wait(
        [self](beast::error_code ec)
        {
            if (!ec)
            {
                // Close socket to cancel any outstanding operation.
                self->_socket.close(ec);
            }
        });
}
我们在主函数中初始化上下文iocontext以及启动信号监听ctr-c退出事件, 并且启动iocontext服务
int main()
{
    try
    {
        unsigned short port = static_cast<unsigned short>(8080);
        net::io_context ioc{ 1 };
        boost::asio::signal_set signals(ioc, SIGINT, SIGTERM);
        signals.async_wait([&ioc](const boost::system::error_code& error, int signal_number) {

            if (error) {
                return;
            }
            ioc.stop();
            });
        std::make_shared<CServer>(ioc, port)->Start();
        ioc.run();
    }
    catch (std::exception const& e)
    {
        std::cerr << "Error: " << e.what() << std::endl;
        return EXIT_FAILURE;
    }
}
``
启动服务器,在浏览器输入`http://localhost:8080/get_test`

会看到服务器回包`receive get_test req`

如果我们输入带参数的url请求`http://localhost:8080/get_test?key1=value1&key2=value2`

会收到服务器反馈`url not found`

所以对于get请求带参数的情况我们要实现参数解析,我们可以自己实现简单的url解析函数

``` cpp
//char 转为16进制
unsigned char ToHex(unsigned char x)
{
    return  x > 9 ? x + 55 : x + 48;
}
将十进制的char转为16进制,如果是数字不超过9则加48转为对应的ASCII码的值
如果字符是大于9的,比如A~Z, a~z等则加55,获取到对应字符的ASCII码值
详细的ASCII码表大家可以看这个https://c.biancheng.net/c/ascii/
接下来实现从16进制转为十进制的char的方法
unsigned char FromHex(unsigned char x)
{
    unsigned char y;
    if (x >= 'A' && x <= 'Z') y = x - 'A' + 10;
    else if (x >= 'a' && x <= 'z') y = x - 'a' + 10;
    else if (x >= '0' && x <= '9') y = x - '0';
    else assert(0);
    return y;
}
接下来我们实现url编码工作
std::string UrlEncode(const std::string& str)
{
    std::string strTemp = "";
    size_t length = str.length();
    for (size_t i = 0; i < length; i++)
    {
        //判断是否仅有数字和字母构成
        if (isalnum((unsigned char)str[i]) ||
            (str[i] == '-') ||
            (str[i] == '_') ||
            (str[i] == '.') ||
            (str[i] == '~'))
            strTemp += str[i];
        else if (str[i] == ' ') //为空字符
            strTemp += "+";
        else
        {
            //其他字符需要提前加%并且高四位和低四位分别转为16进制
            strTemp += '%';
            strTemp += ToHex((unsigned char)str[i] >> 4);
            strTemp += ToHex((unsigned char)str[i] & 0x0F);
        }
    }
    return strTemp;
}
我们先判断str[i]是否为字母或者数字,或者一些简单的下划线,如果是泽直接拼接,否则判断是否为空字符,如果为空则换成'+'拼接。否则就是特殊字符,我们需要将特殊字符转化为'%'和两个十六进制字符拼接。现拼接'%',再将字符的高四位拼接到strTemp上,最后将低四位拼接到strTemp上。
url解码的工作正好相反
std::string UrlDecode(const std::string& str)
{
    std::string strTemp = "";
    size_t length = str.length();
    for (size_t i = 0; i < length; i++)
    {
        //还原+为空
        if (str[i] == '+') strTemp += ' ';
        //遇到%将后面的两个字符从16进制转为char再拼接
        else if (str[i] == '%')
        {
            assert(i + 2 < length);
            unsigned char high = FromHex((unsigned char)str[++i]);
            unsigned char low = FromHex((unsigned char)str[++i]);
            strTemp += high * 16 + low;
        }
        else strTemp += str[i];
    }
    return strTemp;
}
接下来实现get请求的参数解析, 在HttpConnection里添加两个成员
std::string _get_url;
std::unordered_map<std::string, std::string> _get_params;
参数解析如下
void HttpConnection::PreParseGetParam() {
    // 提取 URI
    auto uri = _request.target();
    // 查找查询字符串的开始位置(即 '?' 的位置)
    auto query_pos = uri.find('?');
    if (query_pos == std::string::npos) {
        _get_url = uri;
        return;
    }

    _get_url = uri.substr(0, query_pos);
    std::string query_string = uri.substr(query_pos + 1);
    std::string key;
    std::string value;
    size_t pos = 0;
    while ((pos = query_string.find('&')) != std::string::npos) {
        auto pair = query_string.substr(0, pos);
        size_t eq_pos = pair.find('=');
        if (eq_pos != std::string::npos) {
            key = UrlDecode(pair.substr(0, eq_pos)); // 假设有 url_decode 函数来处理URL解码
            value = UrlDecode(pair.substr(eq_pos + 1));
            _get_params[key] = value;
        }
        query_string.erase(0, pos + 1);
    }
    // 处理最后一个参数对(如果没有 & 分隔符)
    if (!query_string.empty()) {
        size_t eq_pos = query_string.find('=');
        if (eq_pos != std::string::npos) {
            key = UrlDecode(query_string.substr(0, eq_pos));
            value = UrlDecode(query_string.substr(eq_pos + 1));
            _get_params[key] = value;
        }
    }
}
HttpConnection::HandleReq函数略作修改
void HttpConnection::HandleReq() {
    //...省略
    if (_request.method() == http::verb::get) {
        PreParseGetParam();
        bool success = LogicSystem::GetInstance()->HandleGet(_get_url, shared_from_this());
    }
    //...省略
}
我们修改LogicSytem构造函数,在get_test的回调里返回参数给对端
LogicSystem::LogicSystem() {
    RegGet("/get_test", [](std::shared_ptr<HttpConnection> connection) {
        beast::ostream(connection->_response.body()) << "receive get_test req " << std::endl;
        int i = 0;
        for (auto& elem : connection->_get_params) {
            i++;
            beast::ostream(connection->_response.body()) << "param" << i << " key is " << elem.first;
            beast::ostream(connection->_response.body()) << ", " <<  " value is " << elem.second << std::endl;
        }
    });
}
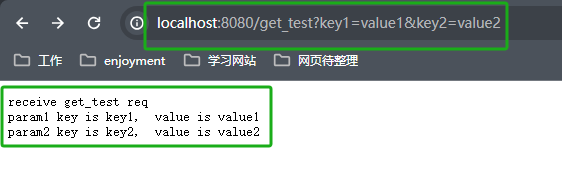
在浏览器输入http://localhost:8080/get_test?key1=value1&key2=value2
看到浏览器收到如下图信息,说明我们的get请求逻辑处理完了