


双击目录树展示图片
页面布局
在ProTreeWidget的构造函数中添加双击信号的槽函数连接
connect(this, &ProTreeWidget::itemDoubleClicked, this, &ProTreeWidget::SlotDoubleClickItem);
接下来实现双击逻辑,判断为鼠标左键,就用一个成员变量_selected_item缓存双击的item,然后发送SigUpdateSelected信号通知右侧区域刷新显示。
void ProTreeWidget::SlotDoubleClickItem(QTreeWidgetItem* doubleItem, int col){
    qDebug() << "ProTreeWidget::SlotDoubleClickItem" << endl;

    if(QGuiApplication::mouseButtons() == Qt::LeftButton)   //判断是否为左键
        {
            auto * tree_doubleItem = dynamic_cast<ProTreeItem*>(doubleItem);
            if(!tree_doubleItem){
                return;
            }
            int itemtype = (int)(tree_doubleItem->type());
            if(itemtype == TreeItemPic){
                emit SigUpdateSelected(tree_doubleItem->GetPath());
                _selected_item = doubleItem;
            }
    }
}
之前在MainWindow的构造函数里添加了ProTree,这次我们要在添加一个PicShow类,PicShow类是我们新增的Qt设计师界面类,这里介绍它的ui内容。
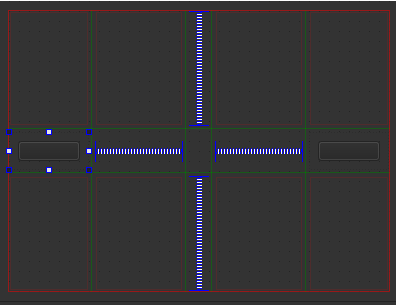
1 在PicShow里添加一个网格布局,然后将PicShow设置为水平布局。
2 然后拖动一个QWidget放到PicShow左侧,再拖动一个QWidget放到PicShow的右侧,拖动一个label放到中间。
3 然后设置两个Widget的宽度都为固定的80像素。将两个widget设置为垂直布局,然后分别添加一个button。
4 拖放两个水平的spacer和垂直的spacer分别放在label的上下左右,保证label居中。
效果如下
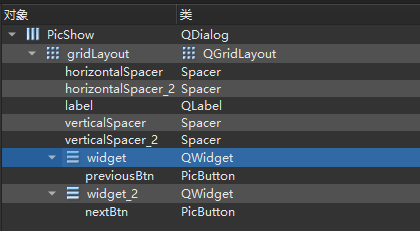
 ui信息
ui信息
 然后在MainWindow里添加PicShow
    _protree = new ProTree();
    ui->proLayout->addWidget(_protree,0);

    _picshow = new PicShow();
    ui->picLayout->addWidget(_picshow);
同时我们为PicShow新增qss文件
PicShow {
    border-color: #9F9F9F;
    border-style: solid;
    border-width: 1px 1px 1px 1px;
    padding: 10px;
    background: rgb(64,66,68);
}
自定义按钮
现在需要实现按钮的悬浮,点击效果,所以需要继承QPushButton,实现我们自己定义的按钮类PicButton。 添加C++类PicButton,基类选择QPushButton。 实现一个设置图标的函数,参数分别为正常状态,悬浮状态,以及按下状态的效果
void PicButton::SetIcons(const QString &normal, const QString &hover, const QString &pressed)
{
    _normal = normal;
    _hover = hover;
    _pressed = pressed;

    QPixmap tmpPixmap;
    tmpPixmap.load(normal);
    this->resize(tmpPixmap.size());
    this->setIcon(tmpPixmap);
    this->setIconSize(tmpPixmap.size());
}
重载event函数,实现根据事件类型刷新按钮样式的逻辑
bool PicButton::event(QEvent *event)
{
    switch (event->type())
        {
        case QEvent::Enter:
            setHoverIcon();
            break;
        case QEvent::Leave:
            setNormalIcon();
            break;
        case QEvent::MouseButtonPress:
            setPressIcon();
            break;
        case QEvent::MouseButtonRelease:
            setHoverIcon();
            break;
        default:
            break;
        }
         return QPushButton::event(event);
}
设置按钮样式的函数很简单,都是通过QPixmap加载的。
void PicButton::setNormalIcon(){
    QPixmap tmpPixmap;
    tmpPixmap.load(_normal);
    this->setIcon(tmpPixmap);
}

void PicButton::setHoverIcon(){
    QPixmap tmpPixmap;
    tmpPixmap.load(_hover);
    this->setIcon(tmpPixmap);
}

void PicButton::setPressIcon(){
    QPixmap tmpPixmap;
    tmpPixmap.load(_pressed);
    this->setIcon(tmpPixmap);
}
所以回到picshow.ui中,将两个QPushButton升级为PicButton。 这样我们在界面上将鼠标在按钮上点击和悬浮等就能看到效果了。
按钮的渐隐动画
接下来我们要实现将鼠标滑动到PicShow区域才显示前进和后退按钮,滑出PicShow区域则不显示。 为使按钮实现渐隐渐现的效果,所以我们通过动画实现。在PicShow的构造函数里创建两个渐隐渐现的动画,将效果绑定到两个按钮上。
    QGraphicsOpacityEffect *opacity_pre = new QGraphicsOpacityEffect(this);
    opacity_pre->setOpacity(0); //设置透明度0.5,透明范围:[0,1]
    ui->previousBtn->setGraphicsEffect(opacity_pre);


    QGraphicsOpacityEffect *opacity_next = new QGraphicsOpacityEffect(this);
    opacity_next->setOpacity(0); //设置透明度0.5,透明范围:[0,1]
    //应用到需要透明变化的控件;
    ui->nextBtn->setGraphicsEffect(opacity_next);

    //使用属性动画类让控件在透明度范围内变化
    _animation_show_pre = new QPropertyAnimation(opacity_pre, "opacity",this);
    _animation_show_pre->setEasingCurve(QEasingCurve::Linear);
    _animation_show_pre->setDuration(500); //动效时长3s


    _animation_show_next = new QPropertyAnimation(opacity_next, "opacity",this);
    _animation_show_next->setEasingCurve(QEasingCurve::Linear);
    _animation_show_next->setDuration(500); //动效时长3s
除此之外还重写PicShow的event函数,捕获其中的enter和leave事件
bool PicShow::event(QEvent *event)
{
    switch (event->type())
        {
        case QEvent::Enter:
            ShowPreNextBtns(true);
            break;
        case QEvent::Leave:
            ShowPreNextBtns(false);
            break;
        default:
            break;
    }
    return QDialog::event(event);
}
根据enter还是leave设置按钮显示和隐藏。显示隐藏的函数通过bool参数控制,根据是否可见并且是否隐藏综合控制动画。
void PicShow::ShowPreNextBtns(bool b_show)
{
    if(!b_show&&_b_btnvisible){
        _animation_show_pre->stop();
        _animation_show_pre->setStartValue(1);
        _animation_show_pre->setEndValue(0);
        _animation_show_pre->start();

        _animation_show_next->stop();
        _animation_show_next->setStartValue(1);
        _animation_show_next->setEndValue(0);
        _animation_show_next->start();
        _b_btnvisible = false;
        return;
    }

    if(_selected_path ==""){
        return;
    }

    if(b_show&&!_b_btnvisible){
        _animation_show_pre->stop();
       _animation_show_pre->setStartValue(0);
       _animation_show_pre->setEndValue(1);
       _animation_show_pre->start();

       _animation_show_next->stop();
       _animation_show_next->setStartValue(0);
       _animation_show_next->setEndValue(1);
       _animation_show_next->start();
       _b_btnvisible = true;
    }

}
这样鼠标滑动和移出PicShow区域就能显示和隐藏button了。
双击左侧目录树实现图片切换
为ProTreeWidget绑定双击的槽函数,并且实现双击后发送信号通知PicShow显示图片 ProTreeWidget构造函数添加
connect(this, &ProTreeWidget::itemDoubleClicked, this, &ProTreeWidget::SlotDoubleClickItem);
双击逻辑
void ProTreeWidget::SlotDoubleClickItem(QTreeWidgetItem* doubleItem, int col){
    qDebug() << "ProTreeWidget::SlotDoubleClickItem" << endl;

    if(QGuiApplication::mouseButtons() == Qt::LeftButton)   //判断是否为左键
        {
            auto * tree_doubleItem = dynamic_cast<ProTreeItem*>(doubleItem);
            if(!tree_doubleItem){
                return;
            }
            int itemtype = (int)(tree_doubleItem->type());
            if(itemtype == TreeItemPic){
                emit SigUpdateSelected(tree_doubleItem->GetPath());
                _selected_item = doubleItem;
            }
    }
}
在mainwindow构造函数中添加信号连接
    auto * pro_pic_show = dynamic_cast<PicShow*>(_picshow);
    connect(pro_tree_widget, &ProTreeWidget::SigUpdateSelected,pro_pic_show,
            &PicShow::SlotSelectItem);
在PicShow里实现SlotSelectItem显示选中图像
void PicShow::SlotSelectItem(const QString& path)
{
    _selected_path = path;

    _pix_map.load(path);
    auto width = this->width()-20;
    auto height = this->height()-20;
    _pix_map = _pix_map.scaled(width,height,Qt::KeepAspectRatio);
    ui->label->setPixmap(_pix_map);

}
这样就实现了点击左侧不同的目录树item显示不同的图片。
图像重绘
因为每次图像形状不同,都会导致重回,这样会造成资源浪费,所以将重回事件写在MainWindow,只在MainWindow改变时重绘
void MainWindow::resizeEvent(QResizeEvent *event)
{
    auto * pro_pic_show = dynamic_cast<PicShow*>(_picshow);
    pro_pic_show->ReloadPic();
    QMainWindow::resizeEvent(event);
}
picshow实现重新加载逻辑
void PicShow::ReloadPic()
{
   if(_selected_path != ""){
     const auto &width = ui->gridLayout->geometry().width();
     const auto &height = ui->gridLayout->geometry().height();
     _pix_map.load(_selected_path);

     _pix_map = _pix_map.scaled(width,height,Qt::KeepAspectRatio);
     ui->label->setPixmap(_pix_map);
   }
}
qss样式补充
因为目录树双击选中效果,悬浮,以及折叠等效果,我们补充一下qss. 以及按钮需要设置为无边框效果
PicShow {
    border-color: #9F9F9F;
    border-style: solid;
    border-width: 1px 1px 1px 1px;
    padding: 10px;
    background: rgb(64,66,68);
}

QWizard {
    color:rgb(231,231,231);
    background-color:rgb(46,47,48);
}

QWizard QLabel#tips {
    color: red;
}

QTreeView {
    color:rgb(231,231,231);
    background-color:rgb(46,47,48);
    border: 0px;
}

QTreeView::item:hover {
    background: rgb(38, 95, 153);
}

QTreeView::item:selected {
    background: rgb(38, 95, 153);
}

/*设置选中条目字体变粗*/
#TreeProActiveItem {
    font-weight:bold;
}


QTreeView::branch:open:has-children:!has-siblings,
QTreeView::branch:open:has-children:has-siblings
{image: url(:/icon/down.png);}


QTreeView::branch:closed:has-children:!has-siblings,
QTreeView::branch:closed:has-children:has-siblings
{image: url(:/icon/right.png);}

#nextBtn,#closeBtn,#previousBtn  {
    border: 0px;
}
前进后退按钮切换图片
在picshow的构造函数中绑定按钮点击信号
    connect(ui->nextBtn,&QPushButton::clicked,this, &PicShow::SigNextClicked);
    connect(ui->previousBtn,&QPushButton::clicked,this, &PicShow::SigPreClicked);
当按钮点击后左侧目录树的选中条目也进行更新,所以在MainWindow构造函数中
    connect(pro_pic_show, &PicShow::SigPreClicked,pro_tree_widget,&ProTreeWidget::SlotPreShow);
    connect(pro_pic_show, &PicShow::SigNextClicked,pro_tree_widget,&ProTreeWidget::SlotNextShow);
    connect(pro_tree_widget,&ProTreeWidget::SigUpdatePic,pro_pic_show,&PicShow::SlotUpdatePic);
ProTreeWidget的更新逻辑, 设置选中item,并且发送更新图片信号。
void ProTreeWidget::SlotPreShow(){
    if(!_selected_item){
        return;
    }

    auto * curItem = dynamic_cast<ProTreeItem*>(_selected_item)->GetPreItem();
    if(!curItem){
        return;
    }
    emit SigUpdatePic(curItem->GetPath());
    _selected_item = curItem;
    this->setCurrentItem(curItem);
}
void ProTreeWidget::SlotNextShow(){

    if(!_selected_item){
        return;
    }

    auto * curItem = dynamic_cast<ProTreeItem*>(_selected_item)->GetNextItem();
    if(!curItem){
        return;
    }
    emit SigUpdatePic(curItem->GetPath());
    _selected_item = curItem;
    this->setCurrentItem(curItem);
}
SigUpdatePic信号会被PicShow的SlotUpdatePic函数绑定,该函数实现了图片的切换展示。
void PicShow::SlotUpdatePic(const QString &_path)
{
    _selected_path = _path;
    if(_selected_path != ""){
      const auto &width = ui->gridLayout->geometry().width();
      const auto &height = ui->gridLayout->geometry().height();
      _pix_map.load(_selected_path);

      _pix_map = _pix_map.scaled(width,height,Qt::KeepAspectRatio);
      ui->label->setPixmap(_pix_map);
    }
}
关闭和激活项目
前文提到了我们要实现关闭项目的功能,在这里补充一下。ProTreeWidget的构造函数添加
     _action_setstart = new QAction(QIcon(":/icon/core.png"), tr("设置活动项目"),this);
    _action_closepro = new QAction(QIcon(":/icon/close.png"), tr("关闭项目"), this);
     connect(_action_closepro, &QAction::triggered, this, &ProTreeWidget::SlotClosePro);
    connect(_action_setstart, &QAction::triggered, this, &ProTreeWidget::SlotSetActive);
关闭项目的槽函数中现弹出一个删除对话框,这个也是我们添加的设计师界面类,不再赘述了。
删除对话框的布局ui是这样的
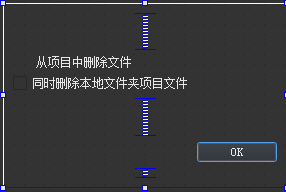 可以勾选同时删除本地文件夹项目文件,这样我们的程序也会把copy的文件删除。
关闭项目逻辑如下
可以勾选同时删除本地文件夹项目文件,这样我们的程序也会把copy的文件删除。
关闭项目逻辑如下
void ProTreeWidget::SlotClosePro()
{
    RemoveProDialog  remove_pro_dialog;
    auto res = remove_pro_dialog.exec();
    bool b_remove = remove_pro_dialog.IsRemoved();
    auto index_right_btn = this->indexOfTopLevelItem(_right_btn_item);
    auto * protreeitem = dynamic_cast<ProTreeItem*>(_right_btn_item);
    auto * selecteditem = dynamic_cast<ProTreeItem*>(_selected_item);

    auto delete_path = protreeitem->GetPath();
     qDebug() << "remove project from path: " << delete_path;
    _set_path.remove(delete_path);
    if(b_remove){
       QDir delete_dir(delete_path);
       delete_dir.removeRecursively();
    }

    if(protreeitem == _active_item){
        _active_item = nullptr;
    }

    if(selecteditem && protreeitem == selecteditem->GetRoot()){
        selecteditem = nullptr;
        emit SigClearSelected();
    }

    delete this->takeTopLevelItem(index_right_btn);
    _right_btn_item = nullptr;

}
判断当前选中的item是否在删除的项目中,如果在则发送SigClearSelected信号。 如果是设置活动项目,我们只需要在槽函数里设置字体变粗即可。
void ProTreeWidget::SlotSetActive()
{
    if(!_right_btn_item){
        return;
    }

    QFont nullFont;
    nullFont.setBold(false);
    if(_active_item){
        _active_item->setFont(0,nullFont);
    }

    _active_item = _right_btn_item;
    nullFont.setBold(true);
    _active_item->setFont(0,nullFont);

}
到目前为止我们点击按钮和item等切换图片的功能就实现了,下一篇实现幻灯片放映。